
To install a geothermal heat pump, start by evaluating your home’s heating and cooling needs with a thorough assessment. Next, install the ground loop system by placing horizontal trenches or vertical boreholes, ensuring proper placement and sealing. Connect the loops to the indoor module, filling the system with antifreeze solution while checking for leaks. Then, set up the air handling unit and ductwork, sealing and insulating thoroughly. Finally, maintain your system regularly to keep it efficient—if you want to learn more, keep exploring the step-by-step process.
Key Takeaways
- Conduct a thorough home assessment and design the ground loop system based on site conditions and climate.
- Drill boreholes or trenches, then install and secure the ground loop piping for optimal heat transfer.
- Fill the loop with a water-antifreeze mixture, ensuring proper pressure, leak checks, and air purging.
- Connect the loop to the indoor air handling unit, sealing and insulating ductwork for efficiency.
- Perform system testing, leak detection, and regular maintenance to ensure long-term, leak-free operation.

Goodman Packaged Heat Pump Unit – 2 Ton (24000 BTU), 13.4 SEER2, 6.7 HSPF2, R32 Refrigerant, Heating & Cooling All-in-One System, Horizontal Design, Residential & Outdoor Packaged HVAC Unit
HIGH EFFICIENCY COOLING AND HEATING: Built as a 24,000 BTU heating and cooling unit with scroll compressor delivering…
As an affiliate, we earn on qualifying purchases.
As an affiliate, we earn on qualifying purchases.
Assessing Home Heating and Cooling Needs
Before installing a geothermal heat pump, it’s essential to accurately assess your home’s heating and cooling needs. This begins with a thorough home evaluation, where a contractor calculates your home’s thermal load using the Manual J method. This calculation considers factors like insulation, windows, and occupancy to determine the right system size. You’ll also need to inspect existing ductwork for efficiency, sealing, and compatibility with the new system. Discussing your project goals is key—whether the system will serve the entire home or specific zones. This assessment helps ensure the geothermal system is properly sized and tailored to your needs, maximizing performance and efficiency. A precise evaluation reduces the risk of under- or over-sizing, leading to better comfort and energy savings. Additionally, reviewing the latest best geothermal heat pumps can help inform your decision. Considering local climate conditions is also crucial, as they significantly impact the system’s efficiency and effectiveness. Incorporating advanced assessment techniques, such as thermal imaging or blower door tests, can further improve accuracy in your evaluation.

SharkBite 1/2 Inch x 500 Feet Orange PEX Pipe, Made in the USA, Oxygen Barrier Flexible Water Tubing for Radiant and Hydronic Heating, U860O500
PEX TUBING: Flex pipe plumbing offers faster installation than rigid pipe and bends easily around corners; oxygen barrier…
As an affiliate, we earn on qualifying purchases.
As an affiliate, we earn on qualifying purchases.
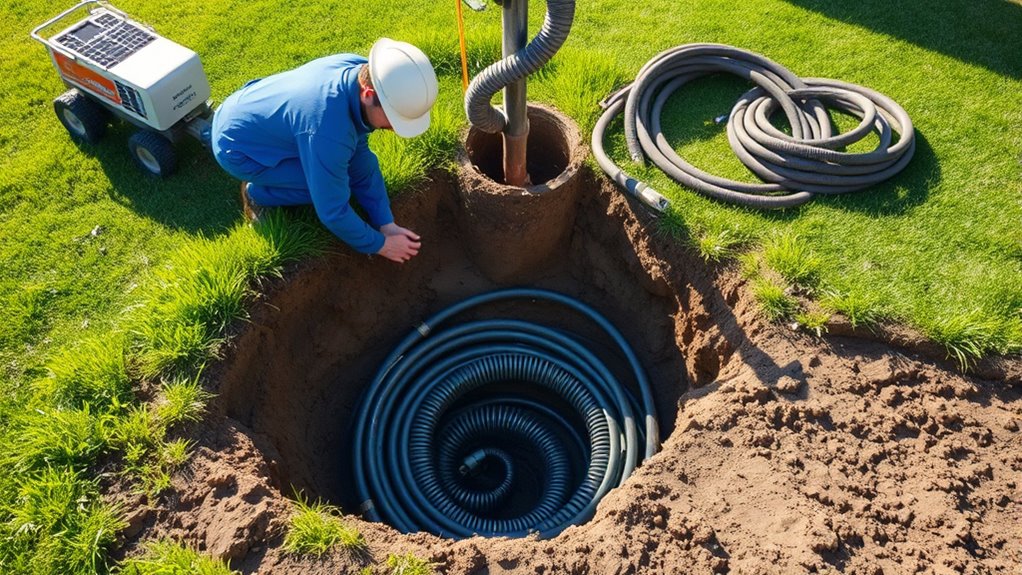
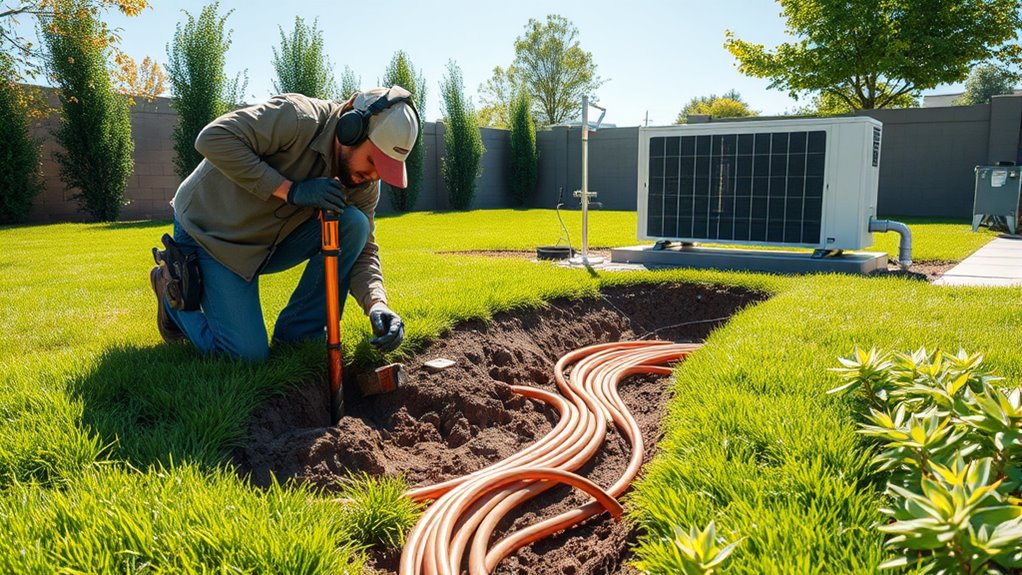
Installing the Ground Loop System

Installing the ground loop system is a crucial first step in setting up your geothermal heat pump. You can choose between horizontal loops, which involve trenching about 6 feet deep, or vertical boreholes drilled several hundred feet into the earth. Proper installation requires careful placement of pipe connections, ensuring secure bends and ground contact for efficient heat transfer. Drilling deep boreholes uses specialized rigs and ranges from 150 to 400 feet, fitting limited spaces. Once installed, pressure testing verifies the system’s integrity and leak-free operation. Additionally, ground loop design should be optimized for your specific site conditions to maximize efficiency. Proper ground loop installation not only ensures system longevity but also enhances overall performance. Proper backfilling or sealing trenches and boreholes secures the loop and prevents ground movement, which is essential for maintaining system stability. Additionally, considering local zoning regulations and obtaining necessary permits are vital to ensure compliance with legal requirements. Conducting a thorough site assessment helps identify potential challenges and ensures the ground loop is correctly tailored to your property’s characteristics.
horizontal trenching tools for geothermal
As an affiliate, we earn on qualifying purchases.
As an affiliate, we earn on qualifying purchases.
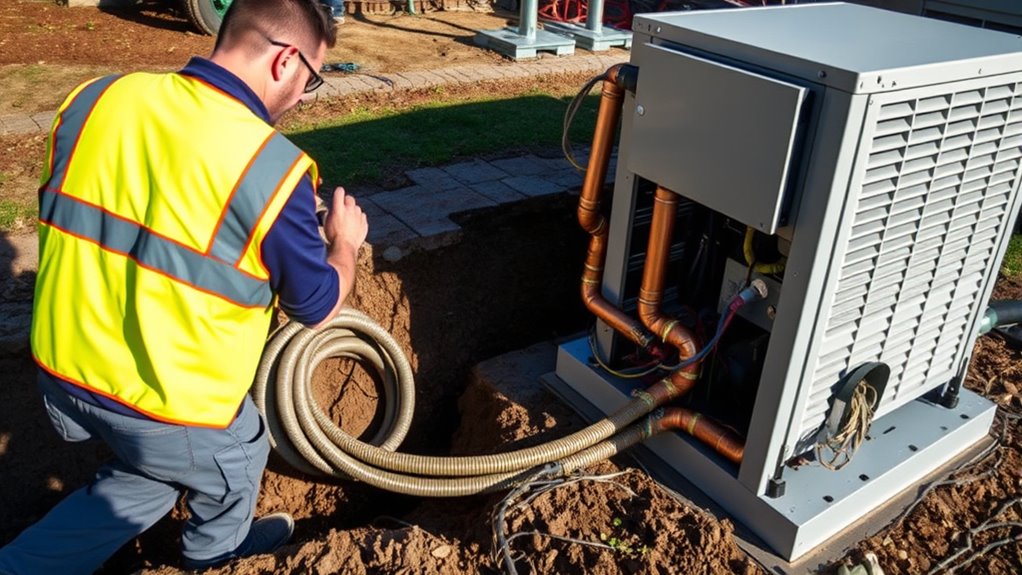
Connecting the Loop to the Home Module

Connecting the underground loops to your home’s heat pump involves attaching insulated piping that’s designed to withstand underground conditions. You’ll make secure, watertight connections between the ground loops and the interior system to guarantee efficient flow and pressure. Proper fittings prevent leaks, which is essential for maintaining system integrity over time. The piping from the ground loops is typically filled with water or antifreeze, facilitating heat exchange during operation. As you connect the components, verify that flow rates are adequate and pressure levels are within specifications. This careful connection process minimizes the risk of leaks and guarantees ideal heat transfer. Ensuring tight, insulated connections supports the system’s longevity, efficiency, and reliable performance of your geothermal heat pump. Additionally, inspecting for any potential leak points during installation ensures optimal system operation and longevity. Incorporating pressure testing before finalizing connections can help identify and resolve potential issues early. Properly managing system pressures also helps in maintaining consistent performance and avoiding damage to components. Conducting a thorough system inspection after installation can further confirm that all connections are secure and functioning correctly.

Compact Crawler Well Drilling Rig, Portable Borehole Machine for Yards
Customizable Water Well Drilling Rig with multiple configuration options to meet various operational needs. Designed for Factory and…
As an affiliate, we earn on qualifying purchases.
As an affiliate, we earn on qualifying purchases.
Setting Up the Air Handling Unit
You’ll start by choosing the best location for your air handling unit, such as the basement, attic, or mechanical closet, ensuring easy access and proper airflow. Next, you’ll connect the ductwork securely, sealing and insulating it to prevent leaks and maximize efficiency. Additionally, consider the role of attention during setup, as maintaining focus can help ensure all connections are correctly made. Proper planning and understanding of environmental considerations can also influence the placement for optimal performance. Moreover, taking into account the importance of family support can foster a safer and more collaborative installation process. An awareness of safety standards can guide you in adhering to local codes and preventing hazards. For example, selecting appropriate ventilation practices can improve overall system efficiency and air quality. Finally, you’ll test the system to confirm proper wiring, control operation, and smooth air distribution throughout your home.
Unit Placement and Connection
Proper placement of the air handling unit is vital for efficient operation and easy maintenance. You should position the unit in a mechanical closet, basement, or utility room, guaranteeing easy access for servicing. Secure mounting is essential to minimize vibrations and noise, enhancing comfort and system longevity. Connect the refrigerant lines carefully to the ground loop system, which transfers heat between the earth and the heat pump. Proper insulation around the refrigerant lines prevents energy loss, while adequate ventilation in the installation area helps maintain ideal airflow. Ensure the unit’s electrical wiring is correctly integrated to power the blower, controls, and safety devices. Additionally, consulting installation guidelines can help ensure all components are correctly assembled and functioning optimally. Incorporating AI-driven diagnostics can further assist in identifying potential system issues proactively, maximizing system performance and simplifying ongoing maintenance tasks. Understanding Gold IRA options can also be beneficial in diversifying your investment portfolio and securing your financial future. Regularly monitoring system performance can help detect inefficiencies early and extend the lifespan of your geothermal system.
Ductwork Integration and Testing
Once the air handling unit (AHU) is securely positioned and connected to the ground loop and electrical system, the next step is integrating it with the ductwork. You’ll seal and insulate the connections to prevent air leaks that can cut system efficiency by up to 20%. Proper sealing ensures ideal airflow, vital for comfort. Next, you’ll perform pressure testing to detect leaks, then balance the system to guarantee consistent airflow throughout your home. During system testing, verify temperature differentials and airflow rates, adjusting controls as needed. This process guarantees your geothermal heat pump operates efficiently and quietly. Incorporating balancing techniques helps optimize the system’s performance and longevity. Additionally, maintaining proper airflow and system balance is essential for maximizing energy efficiency, which can significantly reduce your energy bills. Regular inspections and adjustments can prevent system inefficiencies and extend the lifespan of your geothermal system.
Filling the System With Liquid Solution

Once the ground loops are pressurized and checked for leaks, you’ll introduce the antifreeze solution through the fill ports. As you circulate the liquid, make sure to purge any air to guarantee smooth flow and ideal heat transfer. Monitoring pressure and flow rates helps confirm the system is filled evenly and securely. Proper system maintenance ensures long-term efficiency and prevents potential issues. Regular inspection of the system’s fluid levels can help identify any leaks or air pockets early, maintaining optimal operation. Additionally, using appropriate filling techniques can prevent air entrapment and ensure a complete fill, which is essential for maintaining optimal heat transfer efficiency. Incorporating system pressure monitoring during filling can further enhance the process and detect problems before they escalate.
Filling Ground Loop
After the underground piping is in place, you’ll connect a pump to the ground loop to fill it with a water and antifreeze mixture. During the filling process, you’ll carefully monitor pressure levels to prevent air pockets, which can hinder heat transfer. The antifreeze solution, usually 20-30%, ensures freeze protection while maintaining efficient heat exchange. As you inject the mixture, you’ll watch for proper flow and even filling throughout the loop. Once filled, system testing begins to check for leaks and pressure stability, confirming the integrity of the installation. Proper filling is critical to avoid air pockets and guarantee maximum operation. This step completes the installation phase, setting the stage for the circulating antifreeze solution in the next steps of your geothermal heat pump system.
Circulating Antifreeze Solution
To effectively circulate the antifreeze solution through your geothermal system, you’ll start by sealing the loop and using specialized pumps to introduce the liquid mixture. As you charge the system, the antifreeze flows through the loops, guaranteeing proper circulation. You’ll need to monitor the pressure and flow rates closely to confirm the antifreeze is moving smoothly without any blockages. During this process, it’s vital to eliminate air pockets, as trapped air can hinder heat transfer efficiency. The antifreeze, typically a propylene or glycol-based mixture, prevents freezing and corrosion inside the loops. Maintaining correct pressure levels and steady flow helps guarantee the system is fully charged, ready for maximum operation and long-term reliability.
Ensuring Leak-Free Connection
Filling your geothermal system with the correct liquid solution requires careful attention to detail to guarantee all connections are sealed properly. You’ll perform a leak test after fluid injection, ensuring system integrity and preventing fluid loss during long-term operation. Using pressurized filling equipment, you gradually introduce the water-antifreeze mixture while monitoring pressure gauges to detect any drops indicating leaks. Proper connection sealing is essential to avoid issues later. During this process, air purging is vital to remove trapped air pockets, optimizing heat transfer efficiency. Consistent pressure monitoring and thorough inspection during fluid injection help confirm that all connections are secure and leak-free. This careful approach ensures the system’s durability, efficiency, and reliable performance over its lifespan.
Operating and Maintaining the Geothermal System

Maintaining your geothermal system is essential to guarantee it runs efficiently and lasts for decades. Regular maintenance includes inspecting and cleaning air filters, checking refrigerant levels, and ensuring the circulation pump functions properly. Performance monitoring helps identify issues early and keeps your system operating at peak efficiency. Periodic inspections of electrical connections and control systems prevent failures and extend system lifespan. The ground loop’s integrity should be monitored for leaks or corrosion, though they typically last over 50 years with minimal maintenance. Professional servicing annually can optimize efficiency and detect potential problems early. Additionally, keeping the outdoor heat pump unit clear of debris, snow, and obstructions ensures proper airflow and system performance year-round. Proper care maintains system efficiency and prolongs its life.
Frequently Asked Questions
How Are Geothermal Heat Pumps Installed?
You start by excavating trenches or drilling boreholes to install ground loops at the right depth for efficient heat exchange. Next, you connect the piping to a pump inside your home, then install the heat pump unit, linking it to the ground loops and your ductwork or radiant heating system. Finally, you wire the system, perform safety checks, and test everything to guarantee it runs smoothly before use.
What Is the Process of Installing a Heat Pump?
Installing a heat pump is like giving your home a superpower! First, you evaluate your site to find the best spot for the ground loops and indoor unit. Then, you either trench horizontal loops or drill deep vertical boreholes. Next, you connect the heat pump to the loops, integrate it into your home’s ductwork and electrical system, test everything thoroughly, and finally, learn how to operate and maintain your new system.
How Much Does It Cost to Put Geothermal in a 2000 Sq Ft House?
You’re looking at a cost of $20,000 to $40,000 to install a geothermal system in your 2,000 sq ft home. Ground loop installation makes up the biggest chunk, typically $10,000 to $30,000. Plus, expect extra costs for ductwork upgrades. However, with incentives like the 30% federal tax credit, your net expense drops. Over time, energy savings can offset your initial investment, usually within 4 to 10 years.
What Is the Downside of Geothermal Heating?
The downside of geothermal heating is mainly the high upfront cost, which can range from $10,000 to $40,000, making it a significant investment. You might also face challenges like complex drilling, geological issues, or limited land for loop installation. Additionally, retrofitting older homes can be costly and time-consuming. While it offers long-term savings, the longer payback period of 4 to 15 years may deter those seeking quicker returns.
Conclusion
Once you’ve completed the setup, the system is almost ready to run. But have you double-checked every connection? Is your ground loop perfectly sealed? As you power up your geothermal heat pump for the first time, a new level of comfort awaits. Will it perform as expected? The next steps will reveal the true efficiency of your installation. Get ready—you’re about to uncover a sustainable, reliable heating and cooling solution that could change your home forever.