
TL;DR
Acoustic dampening reduces echoes inside your closet but doesn’t block sound from leaking out. Proper placement and sealing are key to a quiet, professional vocal booth in small spaces.
Imagine recording vocals in a tiny closet, muffled yet echoey. You add foam panels, but the sound still leaks out and reflections bounce all over. Turns out, the secret isn’t just stuffing material into the space—it’s understanding what dampening does versus what soundproofing achieves.
This article will show you how to turn your closet into a better vocal environment. You’ll learn why placement matters, how to block sound leaks, and how to keep your rig cool without turning it into a noisy furnace.
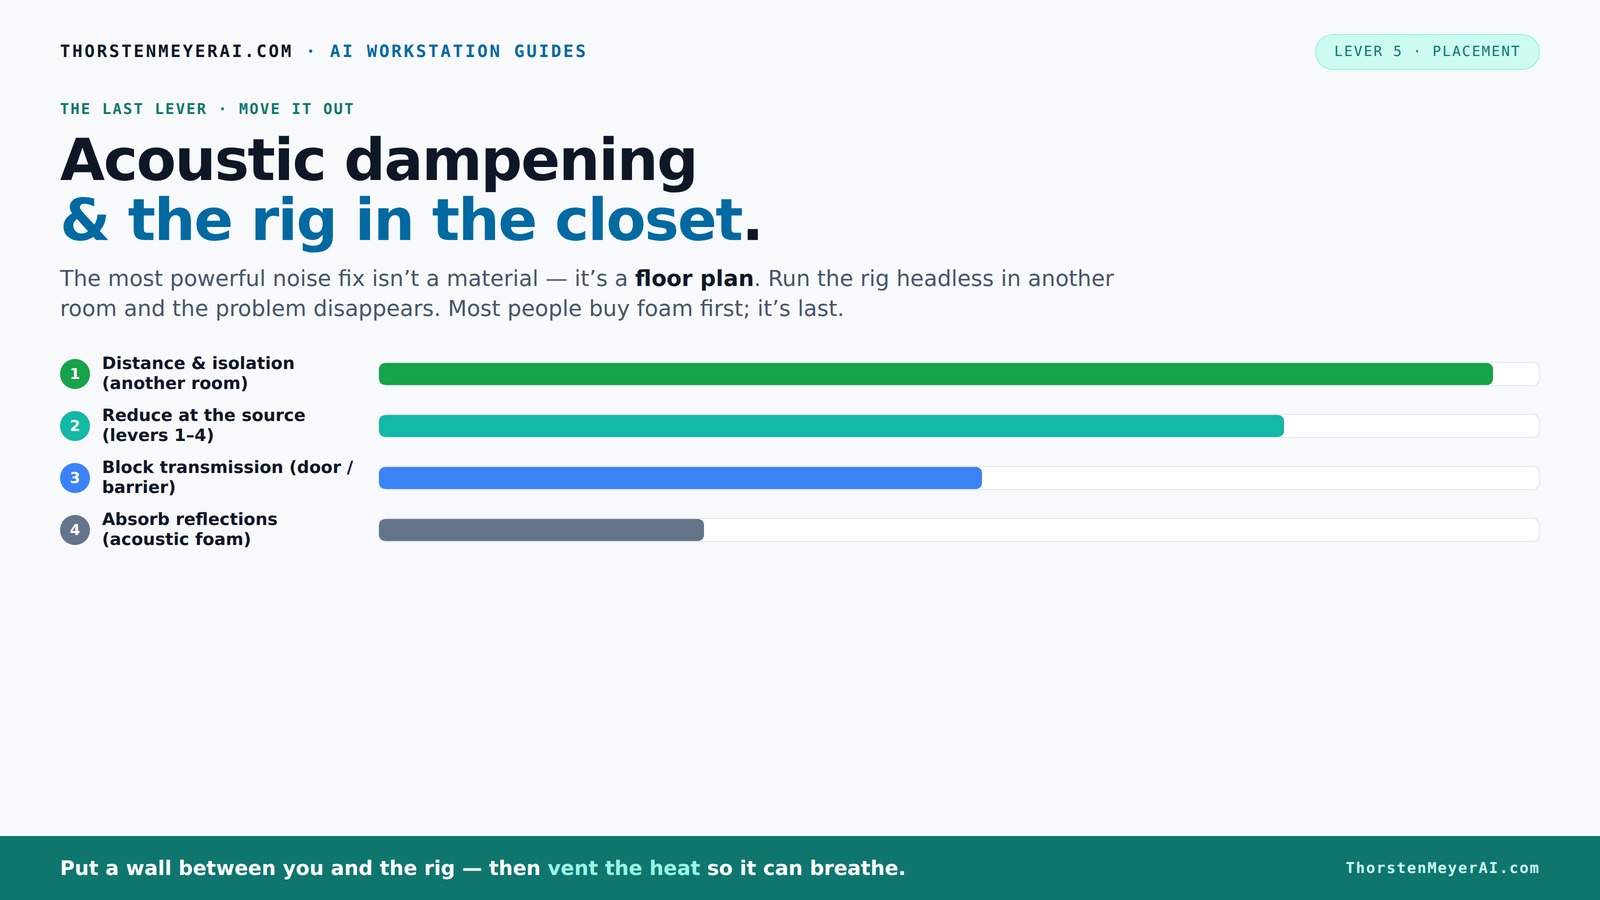
Acoustic dampening
& the rig in the closet.
The most powerful noise fix isn’t a material — it’s a floor plan. A rig you can’t hear because it’s in another room beats any amount of foam. Tap the approaches in Part 1 to see what actually works.
(another room)
(levers 1–4)
(door / barrier)
(acoustic foam)
Contain the noise, not the heat
Key Takeaways
- Use at least 60-70% wall coverage with absorption materials for balanced sound in small closets.
- Seal gaps around doors with weatherstripping and hang blankets to block outside noise leaks.
- Prioritize placement of foam at reflection points—behind the mic, ceiling, and side walls—over random corner stuffing.
- Ventilate actively in a closet rig to prevent heat buildup, using quiet fans or ducting.
- Choose your microphone based on your treatment level; dynamic mics are more forgiving in imperfect spaces.

Focusound 52 Pack Acoustic Foam Panels 1" x 12" x 12" Sound Proof Foam Panles Soundproofing Noise Cancelling Wedge Panels for Home Office Recoding Studio with 300PCS Double-Side Adhesive
Soundproofing - Acoustic foam panels triangular grooves structure for better noise absorption, helps to reduce and absorb unwanted...
As an affiliate, we earn on qualifying purchases.
As an affiliate, we earn on qualifying purchases.
What a closet booth can and can't do for your sound
A closet booth is a DIY hero for reducing echo and controlling reflections. It makes your recordings warmer, less harsh, and more professional. But it’s not a magic shield against outside noise.
Think of it like a sponge—absorption soaks up reflections, but it doesn’t stop sound from passing through walls or the door. If your goal is total silence, you need to combine absorption with sealing gaps and adding mass.
For example, a singer in a closet can sound clear and full, but if the door isn’t sealed, your neighbor’s lawnmower will still sneak in. It’s about managing inside reflections and outside leaks simultaneously.

ATS Acoustics Home Office Residential Acoustic Treatment Room Kit Sound Absorbing Acoustic Panel 12 Pack for 250-380 Sq Ft (Platinum)
12 Piece Kit contains 8 wall panels and 4 ceiling panels, each panel is sized 24" x 48"...
As an affiliate, we earn on qualifying purchases.
As an affiliate, we earn on qualifying purchases.
The real difference: dampening vs. soundproofing
Acoustic dampening and soundproofing are two sides of the same coin, but they serve different purposes. Dampening is all about reducing echoes and reverb inside your space—think of it as softening the room’s 'voice.'
Soundproofing, on the other hand, blocks sound from escaping or entering. It involves sealing gaps, adding mass, and decoupling surfaces.
For example, foam panels inside a closet dampen reflections but won’t stop noise from leaking through a door gap. Conversely, sealing the door with weatherstripping blocks sound but doesn’t affect echo inside the space.
Understanding this distinction is crucial because it influences your choice of materials and where to place them. Over-relying on dampening alone can give a false sense of silence—your space may sound better internally but still leak noise. Conversely, focusing only on soundproofing can be costly and complicated without addressing internal reflections, resulting in a dull or boxy sound. The tradeoff is that achieving both requires a balanced approach: using absorption for sound quality and sealing/mass for isolation.

Audimute Soundproofing Acoustic Door Seal Kit - Door Sweep and Seal - (Standard Size)
Includes a Door Seal (3/16" x 1/2" x 25') and a Door Sweep (1/2" x 1.5" x 4').
As an affiliate, we earn on qualifying purchases.
As an affiliate, we earn on qualifying purchases.
Where to place foam and panels for killer sound inside a tiny closet
Placement of absorption materials is more critical than just covering walls randomly. The goal: target the main reflection points—where your mic and voice meet the space.
Start with the wall behind the mic, the ceiling above, and the side walls. Covering about 60-70% of interior surfaces with thick foam or panels creates a balanced, less boxy sound. But it’s not just about quantity—placement determines how sound waves behave within the space.
By strategically placing panels at reflection points, you prevent sound waves from bouncing directly back into the mic, which causes harshness and comb-filtering effects. This targeted approach preserves natural vocal tone while reducing muddiness. Overdoing coverage can make the space sound unnaturally dead, so aim for a balance that maintains some room liveliness. The tradeoff is that insufficient treatment may leave echoes, while too much can dull the sound, making your recordings sound unnatural.

Portable Recording Booth for Home Studio, Foldable Sound Isolation Vocal Shield with Floor Stand, High-Density Acoustic Blanket Enclosure for Singing, Voiceover & Podcast, Includes Phone Holder
INSTANT STUDIO-QUALITY "DRY" SOUND: Transform any noisy room into a professional vocal booth instantly. Engineered with high-density acoustic...
As an affiliate, we earn on qualifying purchases.
As an affiliate, we earn on qualifying purchases.
How to seal your closet door and block outside sound leaks
The door is the weak link in any closet setup. Soundproofing it is key to keeping noise out and in. Think weatherstripping, sealing cracks, and hanging blankets or soundproof curtains.
For instance, a musician added adhesive weatherstripping around the door frame and hung a heavy moving blanket over it. That cut leakages drastically, giving a much cleaner recording environment.
Remember, even small gaps let sound escape. Use door sweep seals and consider adding a door draft blocker for extra peace of mind. These measures prevent sound from leaking through tiny cracks or under the door, which are often overlooked but can significantly compromise your noise isolation. The tradeoff is that overly sealing the door can make it harder to open or close, so choose materials that balance soundproofing with accessibility.
DIY materials vs. professional soundproof booths—what works?
In small spaces, DIY solutions like blankets, rugs, and foam panels are your best friends. They’re cheap, easy, and surprisingly effective if placed right. For more advanced options, consider professional soundproof booths or sealed cabinets.
High-end soundproof booths or sealed cabinets use mass, damping, and active ventilation to block sound and keep things cool. They’re more expensive but offer peace of mind for serious recordings.
For example, a home streamer built a closet booth with thick blankets and foam, sealing gaps with weatherstripping. The result? Significantly reduced noise bleed and echo—close enough for professional vocals in a budget. The tradeoff is that DIY methods often lack the robustness of commercial solutions, so they may not fully isolate loud sources or prevent sound bleed in very noisy environments. But for most home setups, they strike a good balance between cost and effectiveness.
How much wall coverage do you really need in a tiny closet?
| Coverage Area | Effectiveness | Best For |
|---|---|---|
| 30-50% | Modest echo reduction | Basic home recordings |
| 60-70% | Balanced sound, less boxiness | Professional-sounding vocals |
| 80% or more | Maximum absorption, softer room tone | Critical voice work, podcasting |
The essentials of placing absorption materials for best results
Target the main reflection points: behind the mic, ceiling, and side walls. Use thick foam or bass traps in corners if low-end buildup is an issue. Avoid hard surfaces near your mic—these cause harsh, boxy recordings.
For example, a vocal artist placed foam panels on their ceiling and behind the mic, while leaving the desk clear of reflective surfaces. The result: warmer, clearer vocals with minimal room echo.
Controlling heat in a “rig in the closet” setup—ventilation is king
Placing a high-power rig in a closet requires proper ventilation to prevent overheating.set traps heat, risking overheating. You need active ventilation—passive vents or quiet exhaust fans—to keep things cool. Otherwise, your GPU throttles, noise increases, and equipment risks damage.
For example, installing a small exhaust fan with a duct system effectively pulls hot air out, maintaining safe temperatures while keeping noise levels down. More advanced setups use thermostatic fans and soundproof ducting for maximum silence and cooling.
Check out the [heat and noise reduction strategies](https://thorstenmeyerai.com/reduce-heat-noise-ai-workstation/) for detailed ideas.
Mic choice: dynamic or condenser in a treated closet?
In a well-treated closet, your mic choice depends on your recording needs. Dynamic mics excel at rejecting room noise, perfect if your space isn’t perfectly sealed. Condensers capture detail but pick up more room reflections.
For example, a singer used a dynamic mic in their closet booth, avoiding harsh reflections and background noise. Meanwhile, a podcaster preferred a condenser for its clarity, but added more absorption to tame the room’s reflections.
Should you treat ceiling and floor too?
Yes. The ceiling often reflects sound back down, and the floor can cause flutter echoes, especially in small, parallel-walled spaces. Covering these surfaces with absorption panels or rugs reduces harshness and standing waves.
For example, a DIY closet studio added foam on the ceiling and a rug on the floor. The vocals sounded warmer, with less harshness or boominess.
Will a closet booth make your vocals sound ‘boxy’?
It can, if not properly treated. Small, parallel walls create standing waves and flutter echoes, causing a boxy, boomy sound. Proper placement of absorption materials, especially at reflection points, prevents this.
For instance, a YouTuber added bass traps in the corners and strategically placed panels around the mic, resulting in natural, open vocals without that hollow sound.
Frequently Asked Questions
What is the main difference between acoustic dampening and soundproofing?
Acoustic dampening reduces echoes and reflections inside a space, making recordings sound warmer and less harsh. Soundproofing blocks sound from passing through walls or doors, preventing noise from leaking out or in.
Where should I place foam or panels inside my closet booth?
Place foam at reflection points: behind the mic, on the ceiling directly above, and on side walls facing the mic. Covering about 60-70% of interior surfaces creates a balanced, natural sound.
Do I need bass traps in a small closet?
Yes, especially if you notice low-end boominess or standing waves. Bass traps in corners help tame low frequencies, resulting in clearer vocals and less muddiness.
How do I block sound from leaking through the closet door?
Seal gaps with weatherstripping, hang a heavy blanket or acoustic curtain, and consider adding a door sweep. These steps dramatically reduce outside noise intrusion.
Will treatment make my closet sound like a professional studio?
It can come close—if you combine absorption, sealing, and ventilation. Small spaces will never fully match a large, dedicated studio, but they can sound remarkably good for home recording.
Conclusion
Your closet can become a surprisingly good vocal booth—if you understand the difference between dampening reflections and blocking sound leaks. Focus on placement, sealing gaps, and ventilation, and your recordings will sound clearer and more professional.
Remember: a well-placed, ventilated closet is quieter, cooler, and makes every voice shine. Don’t just stuff foam in corners—think about the whole picture, and your space will become your secret weapon.